从22行有趣的源码库中,我学到了 callback promisify 化的 Node.js 源码实现
从22行有趣的源码库中,我学到了 callback promisify 化的 Node.js 源码实现
1. 前言
大家好,我是若川。欢迎关注我的公众号若川视野,最近组织了源码共读活动,感兴趣的可以加我微信 ruochuan12 参与,如今已进行三个月,大家一起交流学习,共同进步,很多人都表示收获颇丰。
想学源码,极力推荐之前我写的《学习源码整体架构系列》 包含jQuery、underscore、lodash、vuex、sentry、axios、redux、koa、vue-devtools、vuex4、koa-compose、vue 3.2 发布、vue-this、create-vue、玩具vite等10余篇源码文章。
本文仓库 remote-git-tags-analysis,求个star_
最近组织了源码共读活动,大家一起学习源码。于是搜寻各种值得我们学习,且代码行数不多的源码。
我们经常会在本地git仓库切换tags,或者git仓库切换tags。那么我们是否想过如果获取tags呢。本文就是学习 remote-git-tags 这个22行代码的源码库。源码不多,但非常值得我们学习。
阅读本文,你将学到:
1. Node 加载采用什么模块
2. 获取 git 仓库所有 tags 的原理
3. 学会调试看源码
4. 学会面试高频考点 promisify 的原理和实现
5. 等等
刚开始先不急着看上千行、上万行的源码。源码长度越长越不容易坚持下来。看源码讲究循序渐进。比如先从自己会用上的百来行的开始看。
我之前在知乎上回答过类似问题。
简而言之,看源码
循序渐进
借助调试
理清主线
查阅资料
总结记录
2. 使用
import remoteGitTags from 'remote-git-tags';

console.log(await remoteGitTags('https://github.com/lxchuan12/blog.git'));
//=> Map {'3.0.5' => 'c39343e7e81d898150191d744efbdfe6df395119', …}
3. 源码
Get tags from a remote Git repo
这个库的作用是:从远程仓库获取所有标签。
原理:通过执行 git ls-remote --tags repoUrl (仓库路径)获取 tags
应用场景:可以看有哪些包依赖的这个包。 npm 包描述信息
其中一个比较熟悉的是npm-check-updates
npm-check-updates 将您的 package.json 依赖项升级到最新版本,忽略指定的版本。
还有场景可能是 github 中获取所有 tags 信息,切换 tags 或者选定 tags 发布版本等,比如微信小程序版本。
看源码前先看 package.json 文件。
3.1 package.json
// package.json
{
  // 指定 Node 以什么模块加载,缺省时默认是 commonjs
	"type": "module",
	"exports": "./index.js",
  // 指定 nodejs 的版本
	"engines": {
		"node": "^12.20.0 || ^14.13.1 || >=16.0.0"
	},
	"scripts": {
		"test": "xo && ava"
	}
}
众所周知,Node 之前一直是 CommonJS 模块机制。 Node 13 添加了对标准 ES6 模块的支持。
告诉 Node 它要加载的是什么模块的最简单的方式,就是将信息编码到不同的扩展名中。 如果是 .mjs 结尾的文件,则 Node 始终会将它作为 ES6 模块来加载。 如果是 .cjs 结尾的文件,则 Node 始终会将它作为 CommonJS 模块来加载。
对于以 .js 结尾的文件,默认是 CommonJS 模块。如果同级目录及所有目录有 package.json 文件,且 type 属性为module 则使用 ES6 模块。type 值为 commonjs 或者为空或者没有 package.json 文件,都是默认 commonjs 模块加载。
关于 Node 模块加载方式,在《JavaScript权威指南第7版》16.1.4 Node 模块 小节,有更加详细的讲述。此书第16章都是讲述Node,感兴趣的读者可以进行查阅。
3.2 调试源码
# 推荐克隆我的项目,保证与文章同步,同时测试文件齐全
git clone https://github.com/lxchuan12/remote-git-tags-analysis.git
# npm i -g yarn
cd remote-git-tags && yarn
# VSCode 直接打开当前项目
# code .

# 或者克隆官方项目
git clone https://github.com/sindresorhus/remote-git-tags.git
# npm i -g yarn
cd remote-git-tags && yarn
# VSCode 直接打开当前项目
# code .
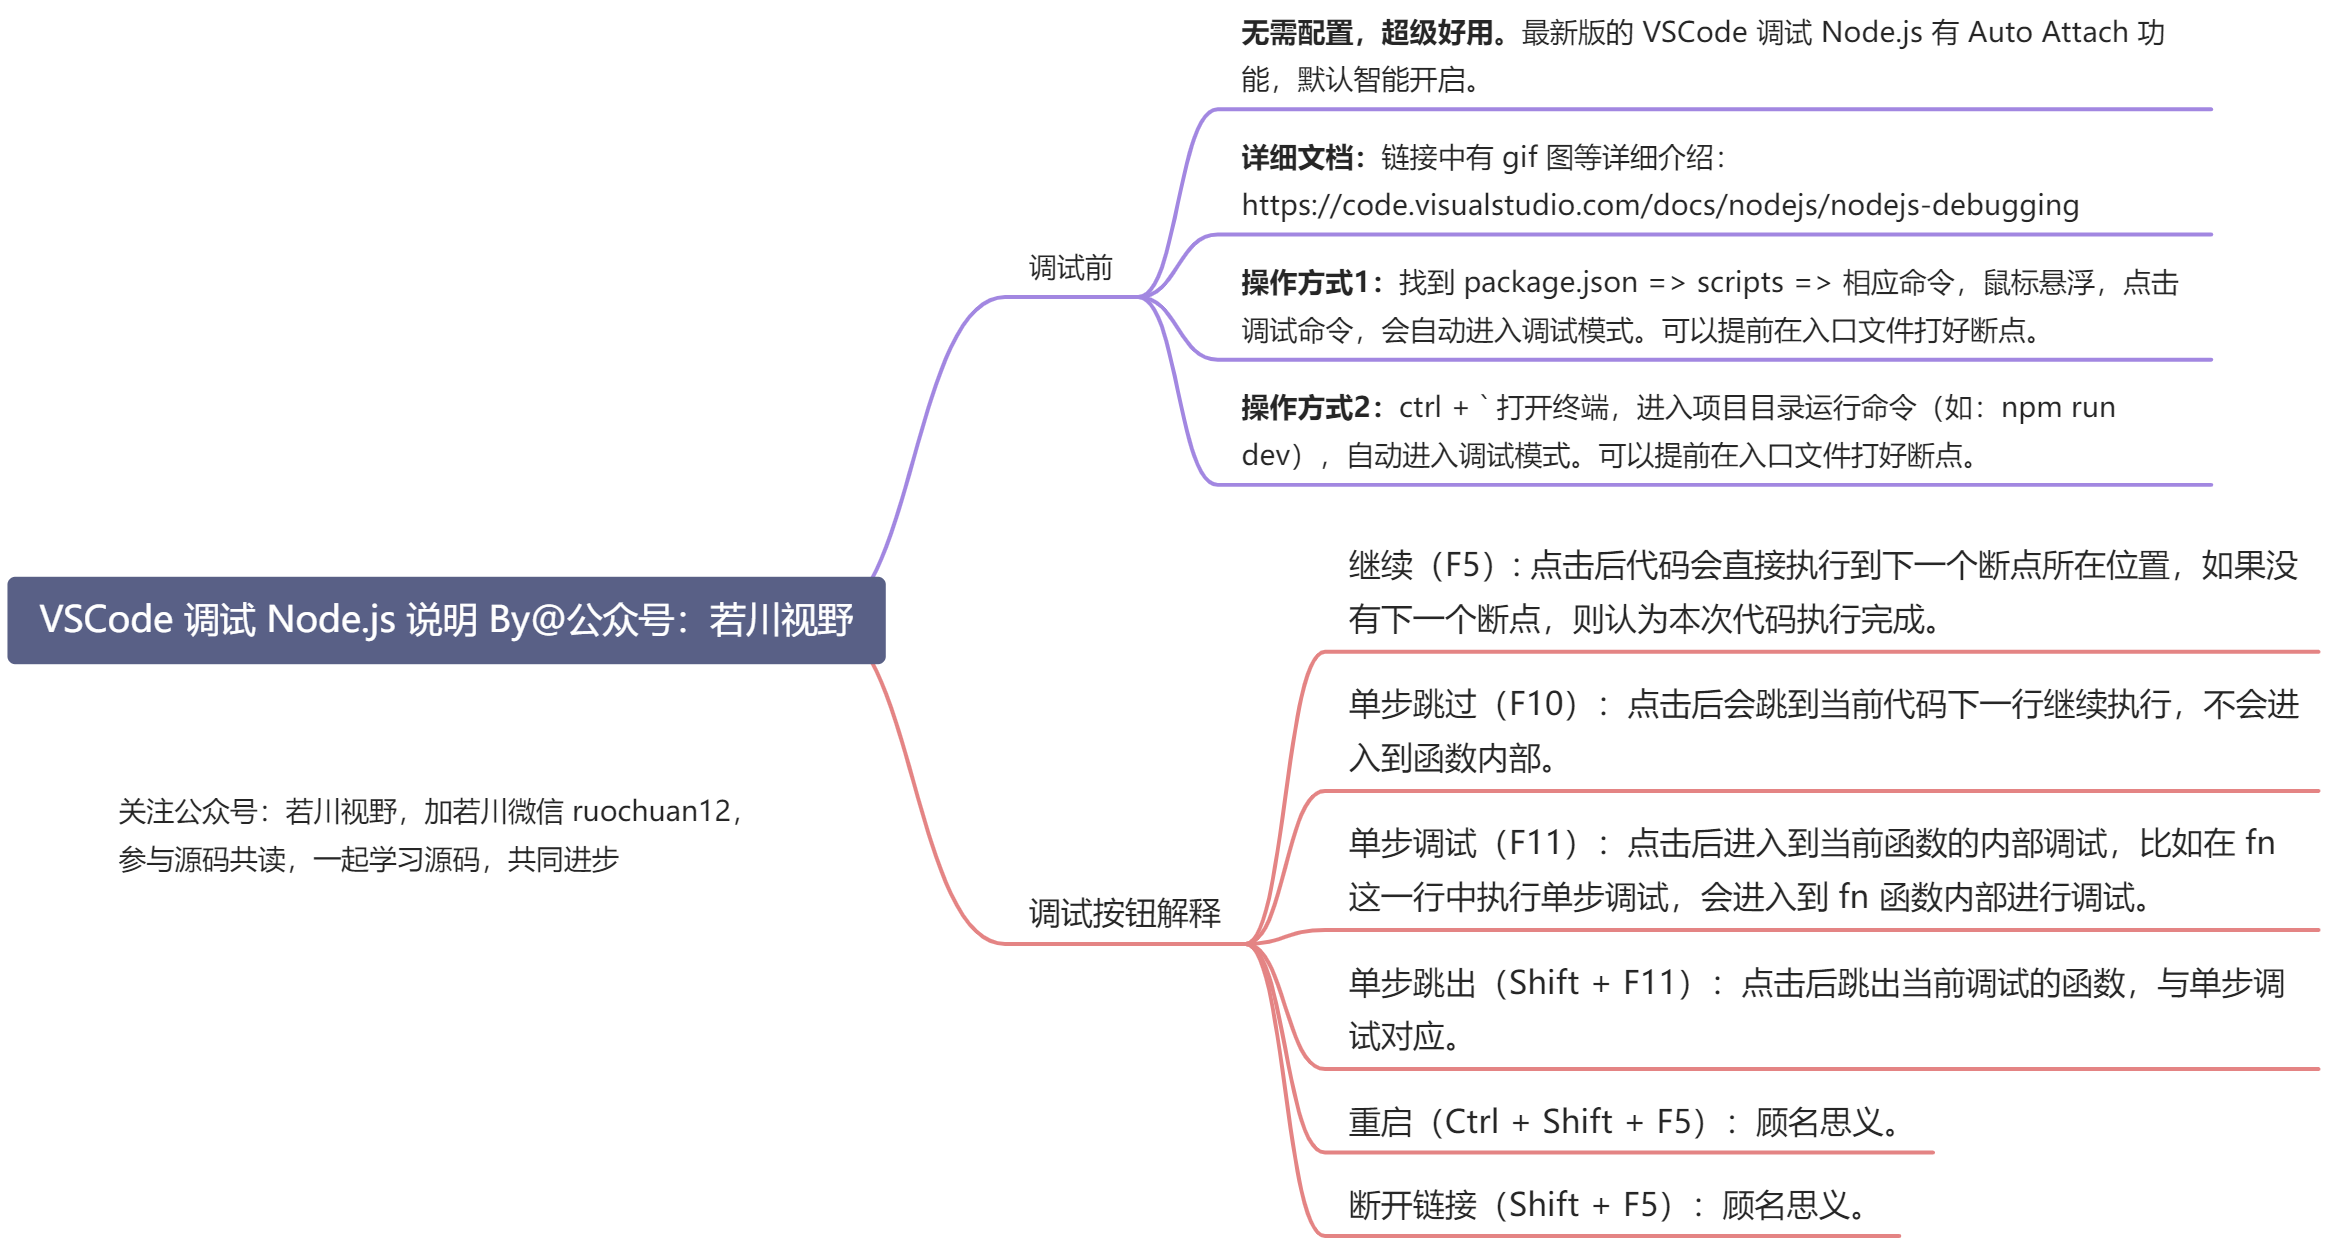
用最新的VSCode 打开项目,找到 package.json 的 scripts 属性中的 test 命令。鼠标停留在test命令上,会出现 运行命令 和 调试命令 的选项,选择 调试命令 即可。
调试如图所示:

VSCode 调试 Node.js 说明如下图所示:
跟着调试,我们来看主文件。
3.3 主文件仅有22行源码
// index.js
import {promisify} from 'node:util';
import childProcess from 'node:child_process';

const execFile = promisify(childProcess.execFile);

export default async function remoteGitTags(repoUrl) {
	const {stdout} = await execFile('git', ['ls-remote', '--tags', repoUrl]);
	const tags = new Map();

	for (const line of stdout.trim().split('\n')) {
		const [hash, tagReference] = line.split('\t');

		// Strip off the indicator of dereferenced tags so we can override the
		// previous entry which points at the tag hash and not the commit hash
		// `refs/tags/v9.6.0^{}` → `v9.6.0`
		const tagName = tagReference.replace(/^refs\/tags\//, '').replace(/\^{}$/, '');

		tags.set(tagName, hash);
	}

	return tags;
}
源码其实一眼看下来就很容易懂。
3.4 git ls-remote --tags
支持远程仓库链接。
如下图所示:

获取所有tags git ls-remote --tags https://github.com/vuejs/vue-next.git
把所有 tags 和对应的 hash值 存在 Map 对象中。
3.5 node:util
Core modules can also be identified using the node: prefix, in which case it bypasses the require cache. For instance, require('node:http') will always return the built in HTTP module, even if there is require.cache entry by that name.
也就是说引用 node 原生库可以加 node: 前缀,比如 import util from 'node:util'
看到这,其实原理就明白了。毕竟只有22行代码。接着讲述 promisify。
4. promisify
源码中有一段:
const execFile = promisify(childProcess.execFile);
promisify 可能有的读者不是很了解。
接下来重点讲述下这个函数的实现。
promisify函数是把 callback 形式转成 promise 形式。
我们知道 Node.js 天生异步,错误回调的形式书写代码。回调函数的第一个参数是错误信息。也就是错误优先。
我们换个简单的场景来看。
4.1 简单实现
假设我们有个用JS加载图片的需求。我们从 这个网站 找来图片。
examples
const imageSrc = 'https://www.themealdb.com/images/ingredients/Lime.png';

function loadImage(src, callback) {
    const image = document.createElement('img');
    image.src = src;
    image.alt = '公众号若川视野专用图?';
    image.style = 'width: 200px;height: 200px';
    image.onload = () => callback(null, image);
    image.onerror = () => callback(new Error('加载失败'));
    document.body.append(image);
}
我们很容易写出上面的代码,也很容易写出回调函数的代码。需求搞定。
loadImage(imageSrc, function(err, content){
  if(err){
    console.log(err);
    return;
  }
  console.log(content);
});
但是回调函数有回调地狱等问题,我们接着用 promise 来优化下。
4.2 promise 初步优化
我们也很容易写出如下代码实现。
const loadImagePromise = function(src){
    return new Promise(function(resolve, reject){
        loadImage(src, function (err, image) {
            if(err){
                reject(err);
                return;
            }
            resolve(image);
        });
    });
};
loadImagePromise(imageSrc).then(res => {
    console.log(res);
})
.catch(err => {
    console.log(err);
});
但这个不通用。我们需要封装一个比较通用的 promisify 函数。
4.3 通用 promisify 函数
function promisify(original){
    function fn(...args){
        return new Promise((resolve, reject) => {
            args.push((err, ...values) => {
                if(err){
                    return reject(err);
                }
                resolve(values);
            });
            // original.apply(this, args);
            Reflect.apply(original, this, args);
        });
    }
    return fn;
}

const loadImagePromise = promisify(loadImage);
async function load(){
    try{
        const res = await loadImagePromise(imageSrc);
        console.log(res);
    }
    catch(err){
        console.log(err);
    }
}
load();
需求搞定。这时就比较通用了。
这些例子在我的仓库存放在 examples 文件夹中。可以克隆下来,npx http-server .跑服务,运行试试。

跑失败的结果可以把 imageSrc 改成不存在的图片即可。
promisify 可以说是面试高频考点。很多面试官喜欢考此题。
接着我们来看 Node.js 源码中 promisify 的实现。
4.4 Node utils promisify 源码
源码就暂时不做过多解释,可以查阅文档。结合前面的例子,其实也容易理解。
const kCustomPromisifiedSymbol = SymbolFor('nodejs.util.promisify.custom');
const kCustomPromisifyArgsSymbol = Symbol('customPromisifyArgs');

let validateFunction;

function promisify(original) {
  // Lazy-load to avoid a circular dependency.
  if (validateFunction === undefined)
    ({ validateFunction } = require('internal/validators'));

  validateFunction(original, 'original');

  if (original[kCustomPromisifiedSymbol]) {
    const fn = original[kCustomPromisifiedSymbol];

    validateFunction(fn, 'util.promisify.custom');

    return ObjectDefineProperty(fn, kCustomPromisifiedSymbol, {
      value: fn, enumerable: false, writable: false, configurable: true
    });
  }

  // Names to create an object from in case the callback receives multiple
  // arguments, e.g. ['bytesRead', 'buffer'] for fs.read.
  const argumentNames = original[kCustomPromisifyArgsSymbol];

  function fn(...args) {
    return new Promise((resolve, reject) => {
      ArrayPrototypePush(args, (err, ...values) => {
        if (err) {
          return reject(err);
        }
        if (argumentNames !== undefined && values.length > 1) {
          const obj = {};
          for (let i = 0; i < argumentNames.length; i++)
            obj[argumentNames[i]] = values[i];
          resolve(obj);
        } else {
          resolve(values[0]);
        }
      });
      ReflectApply(original, this, args);
    });
  }

  ObjectSetPrototypeOf(fn, ObjectGetPrototypeOf(original));

  ObjectDefineProperty(fn, kCustomPromisifiedSymbol, {
    value: fn, enumerable: false, writable: false, configurable: true
  });
  return ObjectDefineProperties(
    fn,
    ObjectGetOwnPropertyDescriptors(original)
  );
}

promisify.custom = kCustomPromisifiedSymbol;
5. ES6+ 等知识
文中涉及到了Map、for of、正则、解构赋值。
还有涉及封装的 ReflectApply、ObjectSetPrototypeOf、ObjectDefineProperty、ObjectGetOwnPropertyDescriptors 等函数都是基础知识。
这些知识可以查看esma规范,或者阮一峰老师的《ES6 入门教程》 等书籍。
6. 总结
一句话简述 remote-git-tags 原理:使用Node.js的子进程 child_process 模块的execFile方法执行 git ls-remote --tags repoUrl 获取所有 tags 和 tags 对应 hash 值 存放在 Map 对象中。
文中讲述了我们可以循序渐进,借助调试、理清主线、查阅资料、总结记录的流程看源码。
通过 remote-git-tags 这个22行代码的仓库,学会了 Node 加载采用什么模块,知道了原来 git ls-remote --tags支持远程仓库,学到了面试高频考点 promisify 函数原理和源码实现,巩固了一些 ES6+ 等基础知识。
建议读者克隆我的仓库动手实践调试源码学习。
后续也可以看看 es6-promisify 这个库的实现。
最后可以持续关注我@若川。欢迎加我微信 ruochuan12 交流,参与 源码共读 活动,大家一起学习源码,共同进步。